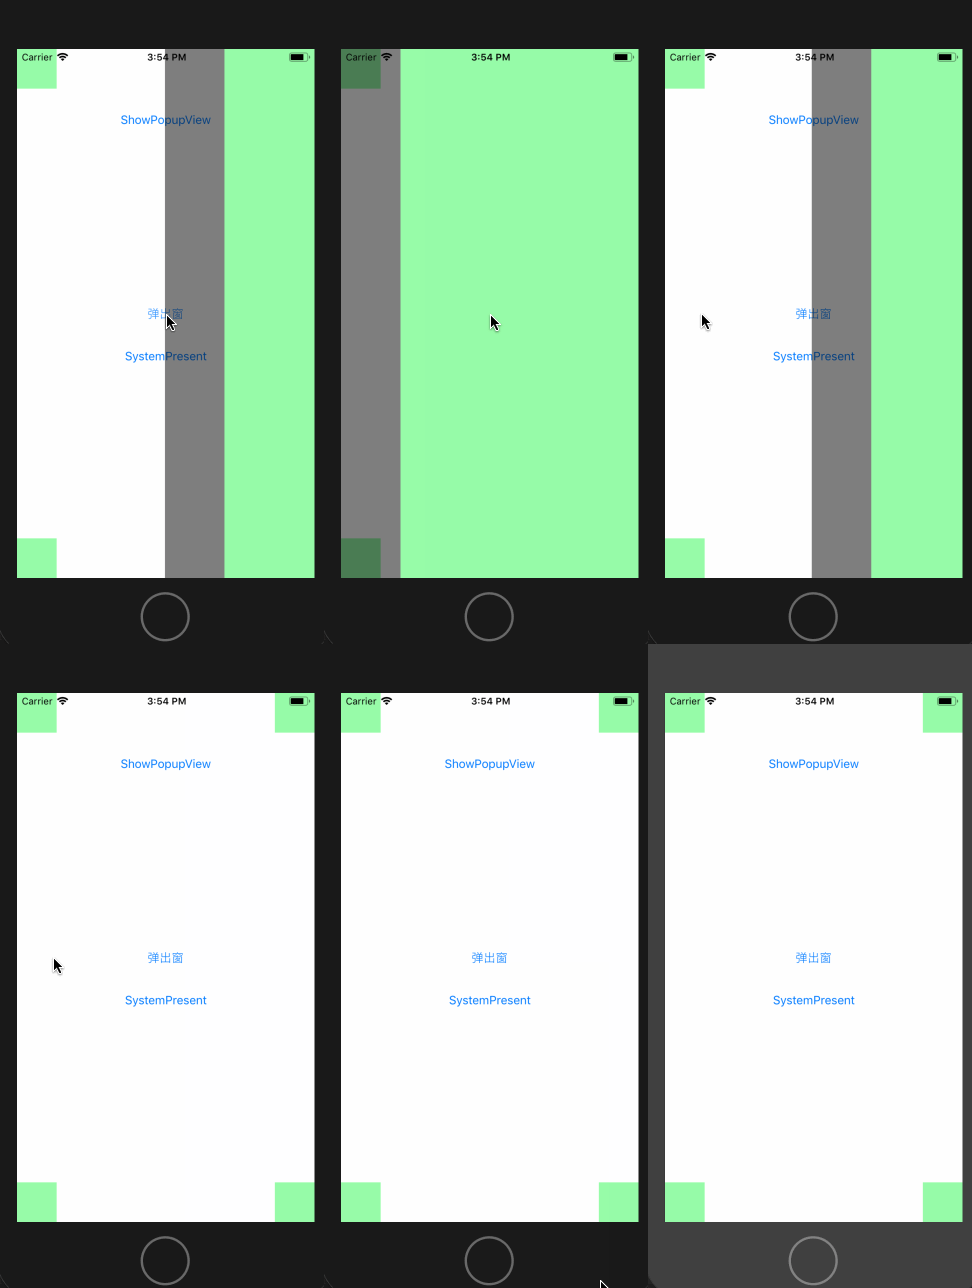
iOS的开发过程中,会遇到弹出模态视图进行交互的情况,用户实际操作区域只占屏幕的一部分,其余区域使用半透明黑色遮罩进行覆盖。下面就记录一下实现如下所示模态视图的方案。
这里有3种实现方案, 根据情况可选择合适的方案:
- 添加视图到
ViewController.view.window上
- 使用系统提供的模态转场
- 切换window
添加视图到ViewController.view.window上
相信大多数人都对这种实现方式很熟悉。该方式是在当前视图的最上层添加一层自定义的黑色遮罩,然后在黑色遮罩上添加真正需要显示的视图,主要代码如下所示:
1
2
3
4
5
6
7
8
9
10
11
12
13
14
15
16
17
18
19
20
21
22
23
24
25
26
27
28
29
30
31
32
33
34
35
36
37
38
39
| @IBAction func showPopupView() {
//1.创建黑色遮罩
let screenRect = UIScreen.main.bounds;
var startFrame = screenRect;
startFrame.origin.x = screenRect.width;
dimmingView = UIView.init(frame: startFrame)
dimmingView.backgroundColor = UIColor.black.withAlphaComponent(0.6)
let tapGesture = UITapGestureRecognizer.init(target: self, action: #selector(hiddenPopupView))
dimmingView.addGestureRecognizer(tapGesture)
//2.创建用户真正关心的视图
var focusViewRect = screenRect
focusViewRect.size.width = 0.8 * screenRect.width
focusViewRect.origin.x = 0.2 * screenRect.width
let focusView = UIView.init(frame: focusViewRect)
focusView.backgroundColor = UIColor.init(red: 137.0/255.0, green: 1.0, blue: 152.0/255.0, alpha: 1)
//3.添加视图到window上
dimmingView.addSubview(focusView)
self.view.window?.addSubview(dimmingView);
UIView.animate(withDuration: 0.25, animations: {
self.dimmingView.frame = screenRect
})
}
func hiddenPopupView(_ sender: UITapGestureRecognizer) {
let screenRect = UIScreen.main.bounds;
var finalFrame = screenRect;
finalFrame.origin.x = screenRect.width;
UIView.animate(withDuration: 0.25, animations: {
self.dimmingView.frame = finalFrame
}, completion: { finished in
self.dimmingView.removeFromSuperview()
})
}
|
使用这种方案时要注意,你若在模态视图中 IQKeyboardManager
第三方库不会起作用。
使用系统提供的模态转场
按道理,这应该是代码量最小的实现方式,但是如果要实现本文开始所示动画(系统默认的是从屏幕底部往上推出视图),则需要自定义动画。另外,由于能够透视遮罩下的视图,需要将弹出的ViewController的modalPresentationStyle设置成UIModalPresentationOverFullScreen,
而该枚举值是iOS 8.0以上才支持。
自定义转场动画的代码如下:
1
2
3
4
5
6
7
8
9
10
11
12
13
14
15
16
17
18
19
20
21
22
23
24
25
26
27
28
29
30
31
32
33
34
35
36
37
38
39
40
41
42
43
44
45
46
47
48
49
50
51
52
53
54
55
56
57
58
59
60
61
62
63
64
65
66
67
68
69
70
71
72
73
74
75
76
77
78
79
80
81
82
83
84
85
86
87
88
89
90
91
92
93
| class SlideSegue: UIStoryboardSegue {
override func perform() {
destination.transitioningDelegate = self
super.perform()
}
}
extension SlideSegue: UIViewControllerTransitioningDelegate {
func animationController(forPresented presented: UIViewController, presenting: UIViewController, source: UIViewController) -> UIViewControllerAnimatedTransitioning? {
return SlideInAnimator()
}
func animationController(forDismissed dismissed: UIViewController) -> UIViewControllerAnimatedTransitioning? {
return SlideOutAnimator()
}
}
// MARK - Animator
class SlideInAnimator: NSObject, UIViewControllerAnimatedTransitioning {
func transitionDuration(using transitionContext: UIViewControllerContextTransitioning?) -> TimeInterval {
return 0.5
}
func animateTransition(using transitionContext: UIViewControllerContextTransitioning) {
let toViewController = transitionContext.viewController(forKey: UITransitionContextViewControllerKey.to)!
let toView = transitionContext.view(forKey: UITransitionContextViewKey.to)
if let toView = toView {
transitionContext.containerView.addSubview(toView)
}
let finalFrame = transitionContext.finalFrame(for: toViewController)
var startFrame = finalFrame
startFrame.origin.x = finalFrame.width
toView?.frame = startFrame
// toView?.layoutIfNeeded()
let duration = transitionDuration(using: transitionContext)
UIView.animate(withDuration: duration, animations: {
if let toView = toView {
toView.frame = finalFrame
}
}, completion: { finished in
transitionContext.completeTransition(true)
})
}
}
class SlideOutAnimator:NSObject, UIViewControllerAnimatedTransitioning {
func transitionDuration(using transitionContext: UIViewControllerContextTransitioning?) -> TimeInterval {
return 0.5
}
func animateTransition(using transitionContext: UIViewControllerContextTransitioning) {
let fromViewController = transitionContext.viewController(forKey: UITransitionContextViewControllerKey.from)!
let toView = transitionContext.view(forKey: UITransitionContextViewKey.to)
let fromView = transitionContext.view(forKey: UITransitionContextViewKey.from)
if let toView = toView {
if let fromView = fromView {
transitionContext.containerView.insertSubview(toView, belowSubview: fromView)
}
}
var finialFrame = transitionContext.finalFrame(for: fromViewController)
finialFrame.origin.x += finialFrame.width
let duration = transitionDuration(using: transitionContext)
UIView.animate(withDuration: duration, animations: {
if let fromView = fromView {
fromView.frame = finialFrame
// fromView.layoutIfNeeded()
}
}, completion: { finished in
transitionContext.completeTransition(true)
})
}
}
|
其余部分的 Storyboard 设置参考 github上本工程代码。
关于视图控制器的自定义转场,以后会单独写一篇来记录。
切换window
这种实现方式的好处是将弹出的用户关心的视图封装到一个新的视图控制器中,与当前的视图控制器分离,从而使业务分离,避免当前的试图控制器臃肿。显示模态视图的代码如下:
1
2
3
4
5
6
7
8
9
10
11
12
13
14
15
16
17
18
19
20
| @IBAction func showPopupViewController(_ sender: AnyObject) {
checkoutNewWindow()
}
func checkoutNewWindow() {
var frame = UIScreen.main.bounds
frame.origin.x += frame.size.width
popWindow = UIWindow.init(frame: frame)
let storyboard = UIStoryboard.init(name: "Main", bundle: nil)
let popupViewController = storyboard.instantiateViewController(withIdentifier: "PopupViewController")
popWindow.rootViewController = popupViewController
popWindow.makeKeyAndVisible()
UIView.animate(withDuration: 0.5, animations: {
let rect = UIScreen.main.bounds
self.popWindow.frame = rect
})
}
|
本工程所有代码见github
目前已转行教育行业,欢迎加微信交流:CaryaLiu
 Popup_Window动画